Piercing Aftercare in Detail: Salt of Life

January 24, 2009

salt-1-100_1254-copy

Salt is, of course, necessary for human survival.  The search for and trading of salt has impacted trade and the rising and falling of nations.  It seasons and preserves food, and as we know, it also has therapeutic uses.  Salt is great stuff–you can eat it, gargle with it, and bathe with it.

Of course, it’s also one of the main components of basic body piercing aftercare. In case you missed my obsessive cross-linking, here’s my post on how to do sea salt soaks for your piercings:  Like Chicken Soup for your Piercings.

The APP’s standard aftercare recommends a “non-iodized sea salt solution.”  That’s all very well, but what exactly is sea salt, where can you find it, and why can’t you just use Morton’s off the shelf?
salt-3-100_0923-copy

Salt comes either from mines or from the sea, and the nutritional value of each is the same. The chemical composition of salt is NaCl, or sodium chloride.  Regular table salt is refined, then anti-caking agents are added for pourability.  Iodine is also added as a nutritional supplement.  You do not want these additives in your piercing!

There are many varieties of salt. Look for salt which has no additives.

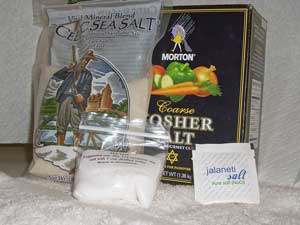
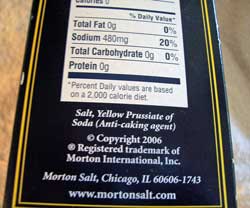
Some people recommend kosher salt, which you can find in your grocery store.  Kosher salt is raked during the mining process to produce a fluffy texture which melts well.  But look! The box I have, which I use for cooking, has “yellow prussiate of soda” in it added as an anti-caking agent.  So, read the labels for any type of salt you are considering purchasing for your sea salt soaks.
salt-4-100_0917-copy1

Another type of salt you may find in your grocery store is Celtic Sea Salt, or another brand of gourmet sea salt.  This type of salt is off white, almost gray, due to the trace minerals which haven’t been refined out.  I use this stuff in food, to brush my teeth for gum therapy, and for therapeutic baths.  I personally don’t know what effect these trace minerals have on piercings, so I prefer to use plain, refined NaCl without any additives if I can get it.

Not Epsom salts! Epsom salts (magnesium sulfate) may have therapeutic benefits, but they are not what is recommended for your piercing.  Food grade rock salt may be okay (not the crap stuff they sell to put on roads), but remember you want this stuff to dissolve in hot water.

salt-2-100_0909-copy

Where to Find Salt for your Aftercare:

Your piercer.  The best studios will have salt available, either for purchase, or given as a freebie with your aftercare instructions.  If they don’t have it for sale ask them–why not?

Your grocery store or health food store.  A health food store is often a good bet.  I found the individual packets of pure NaCl pictured above sold for use in neti pots (jalneti).  Avoid products with anti-caking agents or iodine added.

Online.  Many body jewelry retailers carry salt for aftercare. Here are a couple of sources from my favorite sites:

Sea Salt from Tribalectic

Jala Neti Pot Salt from Yoga & Life  (Neti pots are fabulous health aides too–check them out!)

Sea Salt from BodyArtForms

Note:  You can also use pre-packaged sterile solution for your piercing aftercare, which you can buy at a drugstore.  Not contact lens solution! Contact lens solution has added stuff!

You can also buy proprietary aftercare solutions, like H2Ocean, containing salt.  Let me just say here:  I don’t like them! You don’t know exactly what you are getting, and most of them are much more expensive than plain salt.   In addition, sprays, while they might be good convenience products for aftercare when you’re on the road or running around, don’t allow for the beneficial effects on your piercing of immersion in hot salt water. All this stuff smacks to me of people just wanting to cash in on the popularity of body piercing, and I can’t see any of it is better than plain, cheap, natural salt therapy. Again, read the labels and know what you are buying.

Some further links to info about salt and salt therapy:

Salt Works

Celtic Sea Salt

Geology of Salt from About.com

Too much salt is bad for you, but I love it!


Aftercare in Detail – Pt. 2: Cloud’s Routine

January 18, 2009

little-support-100_1207-cop

Your body does the healing.  It’s your job, as a new piercee, to support your body in its efforts.

A basic aftercare routine is to soak your piercings in a mild saltwater solution (or rinse, for oral piercings) and to keep the area clean by washing with soap.

A word about “standard” aftercare. The APP has promulgated standard aftercare which you can read here for body piercings and here for oral piercings.  But your body may not be “standard,” or your piercer may have other ideas for aftercare.  The key is to use your common sense and be aware of how your own body reacts.

CLOUD’S AFTERCARE ROUTINE FOR BODY PIERCINGS

Rather than repeating the party line, I’m going to go over my own aftercare routine, which I’ve developed over the years based on piercers’ suggestions and trial and error.  (Note: this is for body piercings only, not oral piercings.)

For the first couple of weeks (or however long I can stand it), I soak with salt or herbs, and shower with soap, twice a day, or every 12 hours.  I also use oil as a healing aid. Here’s how:

1.      I clean and prepare. First, I make sure everything is clean and I have all my supplies (salt, herbs, oil).  I make sure the surfaces in my kitchen or bathroom have been cleaned and disinfected, and that I have paper towels, clean sheets and pillowcases, and clean towels.

2.      I wash my hands.  I wash my hands before touching my piercing or doing anything aftercare related.  And I mean WASH! With hot water! and soap! and friction!– not just a quick rinse under the faucet.

3.      I prepare my herbs. In the beginning, I like to soak with herbs, rather than, or in addition to, salt water solution, for the antibacterial, anti-bruising, and healing effects.  Since the herbal mixture takes several hours to steep, I make my herbal infusion, using lavender, or a mixture of lavender, arnica, and red clover (more details on this here).

4.     I soak. I tend to do more salt soaks a little later in the healing process, when the crusties show up, because the action of the salt water draws out the material inside the piercing.  If I want to do a sea salt soak, I mix my sea salt solution.  I heat my salt solution (or herbs) in the microwave until it’s as hot as my skin can stand. Then I soak, for 5-10 minutes.  Using a cup, I bring the cup to my piercing and (hopefully) make a vacuum seal.  This works great for things like nipples and navels.  For things like ears and genitals, I use a bowl on the floor.  On a towel!  I describe doing sea salt soaks in detail here:  Like Chicken Soup for Your Piercings!

shower-2649339884_7087e2cb9d_m

5.     I shower. Showering is an important part of daily piercing aftercare.  Even if you don’t do sea salt (or herbal) soaks, just letting hot water over your piercing is going to help keep it clean and remove the crusties.  Since it’s important to rinse any salt off, if I do sea salt soaks I shower afterwards.  (If I do herbal soaks, I usually soak after the shower because there’s no need to rinse off).

–Turn the water on hot and let the steam build up.  I take my time and let the steam and water soften my skin, the piercing and any crusties still on there.  I let the water run over my piercing for a while.  This is a good argument for getting pierced in winter when a long, hot, steamy shower will feel great.

I use Provon antimicrobial soap.   First, I wash my entire body with it, head to toe.  There are a lot of microorganisms that live on your skin, and they can migrate, or travel, so the idea here is to cleanse your skin both of ordinary surface dirt and to kill any bad germies so they don’t get to your piercing.  I use a tiny bit at a time, working up lather, and rinse well.

–Then, and only then, after a long steam and soak, and after cleansing the rest of my body, do I wash my piercing.  Again, I take a tiny bit of Provon, and lather it up, and place it gently on and around the piercing.  I let it sit there for 30 seconds, then rinse off.

It is not necessary to rotate your jewelry, scrub it, move it back and forth vigorously to get soap in there, or any of that!  I might choose to gently manipulate the piercing during this soaping and rinsing stage, when the skin is soft and pliable, and the jewelry is lubricated, if I think it needs it, for positioning purposes, or for cleaning any remaining crusties.  But only move your jewelry if it wants to go, and never force it!  Overcleaning and rough treatment will harm your piercing!

6.    I dry off. I dry off with paper towels.  (Okay, I use a clean towel for most of my body, and paper towels for the area around my piercing.)  Not only do towels harbor germs, but those terry loops can catch painfully on the jewelry.  Ouch!  It’s important to dry your piercings thoroughly.

7.   I apply oil. For the final touch, I apply a little bit of oil (emu, almond, jojoba, etc.) on and around the piercing exit holes.  (NOT in the piercing holes.)  This helps keep the skin from drying out and gives a little “ease” to the jewelry, and helps keep crusties from sticking so bad on the jewelry, too.  More on oil later.

Then, I wait. Again, keeping in mind the general principles I discussed in Part 1, you want to protect your piercing, keep it clean, and give your body time to heal.  Disclaimer:  This is only one person’s opinion and routine.  Remember, your piercer is your first resource for piercing advice.

Thanks to Krikit’s photostream and Flickr.


‘Twas the Night Before Piercing . . .

December 19, 2008

and I’m caught up in my pre-piercing ritual.

Clean: disinfect services, sinks, bathrooms, doorknobs, light switches; make sure I have clean towels, sheets, extra clean pillowcases

Gather supplies: soap, paper towels, bandages, salt and herbs for soaking

Prepare: Research likely piercings; perform a little extra grooming, make sure I get enough rest–and don’t dwell on the pain!


Like Chicken Soup for Your Piercings!

November 4, 2008
Awkward, but worth it!

Awkward, but worth it!

One of the best things you can do for your piercings is to do “sea salt soaks.” It’s a cheap natural remedy that you can do with a fresh piercing, or any time your piercing acts up.

The whys and wherefores: Piercings heal from the outside in, and soaking helps irrigate and drain the wound inside, where you can’t see. A warm, mild salt water soothes and helps to clean the dried lymph and skin cells (“crusties”) off. The difference in alkalinity between the saltwater and the surface of your skin draws out the fluid and other matter that accumulates in the wound. Hot water also opens the capillaries, bringing blood flow and therefore oxygen to the piercing site, encouraging healing.

The Salt: Use sea salt, not regular table salt (which has ingredients added to prevent it from clumping; it may also have iodine or other undesirable ingredients). Look for salt labeled, “non-iodized sea salt.” Sea salt is not rock salt or Epsom salts! Kosher salt without any additives can be used, but coarse granules take longer to dissolve. Salt sold at health food stores or Indian groceries as “jal neti” salt (for neti pots) is also good. Look for non-iodized sea salt in the grocery store or health food store. You can also find it at online retailers selling body jewelry and supplies, or from your piercer. It’s not hard to find—really!

Basic Recipe: 1/4 teaspoon to 1 cup (8 oz) water. The correct proportions are very important for the process to work. If the solution is too weak, it will be ineffective; if too strong, it may cause the cells to swell and burst, irritating your piercing and the skin around it.

Mix it: Wash your hands! Then, mix the measured amount of salt in a clean container with very warm, not hot, water, or pop it in the microwave for thirty seconds or so (don’t burn yourself). Bottled, filtered, or distilled water is optimal but not required.

Soak: Once or twice a day for 5-10 minutes. Soak before showering, or rinse afterwards with clear water (it’s important to make sure no salt residue remains on your skin). Use a cup or bowl. You may have to lie on the floor, or lean over a table; for navel piercings lean over and seal the cup onto the area to create a vacuum. For those awkward areas, like eyebrows or nape piercings, you can also saturate a sterile gauze pad or a strong paper towel and apply it (but it probably won’t be as effective as immersion). Cotton balls or buds may leave fibers in the piercing—a bad idea.

Note: Be clear on the difference between soaking and cleaning. Although soaking does have the effect of cleaning crusties and junk off your piercing, soaking by itself is not enough. Proper hygiene, in the form of cleaning with mild soap is also recommended for proper piercing care. Cleaning your hands, body, and around the piercing reduces surface dirt and microorganisms on the skin which can cause infection.